8
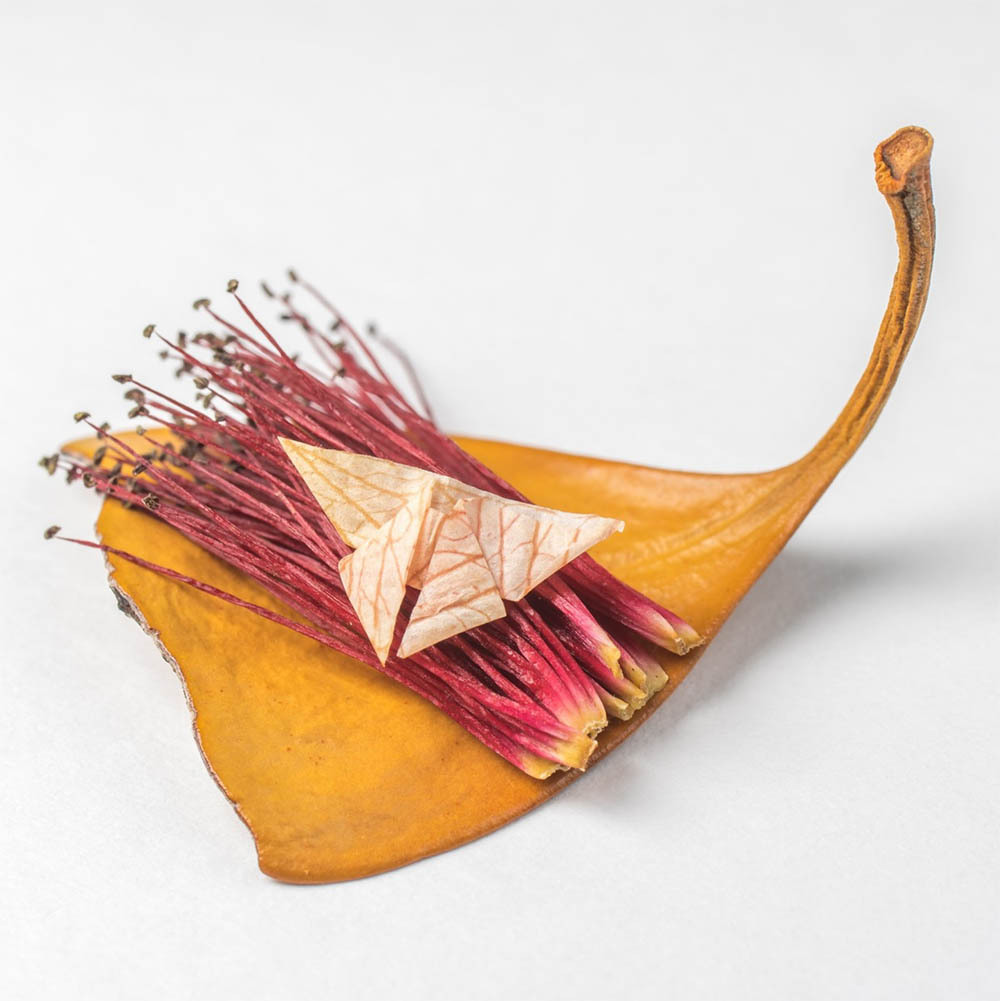
What kind of paper would you use to fold flowers? As folders, we know that finding the right paper for the model we want to fold (and vice versa) is important for achieving the right form and appearance. Personally, I’ve used a lot of different materials for my work, including everything from printer paper and aluminum foil to cellophane, fabric and more. When folding origami flowers, why not use flower petals? I first became interested in this idea when my attempts at a Guinness World Record for the smallest origami crane made by hand turned out to be in vain (another story for another time), and I needed something else to make my mark in the origami world. What started from a thought in my head turned into a labor of love that took me from countless local florists, botanic gardens, herbariums, to the writings of David Lister, email correspondence with Robert Lang about paper in origami, and now to you, the reader. Suffice to say, I have spent years exploring this unique aspect of our shared craft. I invite you to read on, learn from my experience, and try it for yourself. A crane folded from a rose petal by Michael Lai. Photo: Deb Yarrow. Hanakami: A Definition How can we describe the folding of flower petals? Certainly, there are no words for it in Japanese or English. “Orihana,” meaning “folded flower” (折り花) is a strong choice, but I am sure it is already in use. “Hanagami” might be grammatically correct, except that it also means “tissue paper” in Japanese (鼻紙). However, our emphasis is on the fact that organic materials in the form of flower petals are being substituted for paper. So, taking the Japanese kanji character for “flower” (花 — hana), and using the same character for “paper” (紙 — kami), we can combine the two words to form “hanakami” (花紙 — hanakami), a portmanteau to mean “using flower as paper,” or “flower paper.” It is not the folding of flower petal models, but the folding of origami models using flower petals. No matter what you choose to call it, flower petals can be folded into delicate origami models with intricate details that are revealed when you take a closer look. A crane’s wing folded from a petal. Photo: Deb Yarrow. How To Fold Origami From Flowers By turning a flower petal into an origami model of a flower, we create an abstraction of its original form. In doing so, we provide an alternate way in which the beautiful and delicate petal is given a second life while retaining its natural state. There is also something to be expected and accepted in the process of folding flower petals, as they are not designed to be square or creased, nor do they come in standard sizes. Here’s what you’ll need to get started: Flower petals large enough for the model you want to fold. A flower press or blotting paper (you can also use any clean and absorbent paper) and something to weigh them down. A sharp knife (preferably scalpel) to cut the petals. A cutting mat or something to protect the surface where you cut the petals. A steel ruler or square (tool). A fine but round-tipped instrument (knitting needle, crochet hook, chopstick, etc.), if necessary to help with manipulating petals. Tools used to cut petals fo folding. Photo: Michael Lai. The fragile nature of a pressed and dried petal adds to the challenge of practicing origami. In addition, because common flower petals are quite small, you’re likely to end up folding smaller origami models. 1. Collect Petals I personally don’t use flowers in full bloom, as this is their time to shine, and prefer to collect them late in the season, when they have fallen to the ground. Fallen petals also have lower moisture content and are therefore easier and quicker to dry and press. Flowers come in all shapes and sizes, but not all of them are available year-round. Here are some things to consider when experimenting with different types of flower petals: Flowering season(s) Shape and size of petals Colors and patterns when dried and pressed Thickness of petals when dried Surface texture, including density and thickness of veins Structure and curvature of individual petals Fragrance When you are experimenting with different origami models, also consider the following: Size of model you want to make compared to the size of petals you collect Difficulty of model and the number of attempts you need compared to the number and availability of petals Types of folds required compared to the thickness and strength of the petals Type of pattern for the model compared to the color and pattern on the petals The primary considerations in selecting the types of flowers to use for origami are based on the physical characteristics of the petals, as determined by color, size, shape, pattern and thickness. Generally, blooms that are flat, have minimal petals, and aren’t too thick tend to be easiest to prepare and fold. Thinner petals will dry more evenly and are less likely to become moldy during the process. Since larger flowers tend to have a thicker and more fibrous composition as well as more prominent veins running through the petal, they become more brittle and more difficult to fold when pressed and dried. In terms of colors, flowers contain the highest concentration of pigments just before their peak bloom. However, rather than depriving flowers the chance to be in full bloom, it is preferable to pick or collect them when they begin to fade. The rate at which colors of the petal fade before and after drying should also be taken into consideration. Dry the petals as soon as possible after picking maximizes the amount of color you can preserve, but the gradual process also creates a nice variation of different shades. This is particularly true for wilted or damaged flowers, which offer a broader selection of colors when compared to healthy flowers. Recommendation: Pick petals that are larger, flatter and have less curvature. This will increase the available surface for folding and reduce the distortion of its shape when pressed onto a flat sheet. Keep in mind that the natural oils produced by the skin can transfer when handling flower petals. Any pressure you apply to the surface of the petals may leave fingerprint impressions. Types of flowers I have experimented with: Bougainvillea. The heart-shaped petals of these pink to purple flowers are curvy and feature prominent veins. They are very light, thin to the touch, and easy to press. However, they dry easily and can become quite brittle. Delonix regia. This flower features flat, fan-shaped petals with bright red colors, although a rarer yellow species can also be found. The petals are very soft to the touch and can wrinkle easily when pressed and dried. Frangipani or plumeria. Typically yellow or pink, this flower is known for its fragrance. The curvature along the length of the petal is straightened when pressed. Although thicker towards the stem, the body of the petal is good for folding, as it is naturally pliable. The yellow and white variety of this flower allows for some interesting color patterns when folded. Orchid. An amazing range of colors, sizes, shapes and patterns to choose from, the common species have large, flat petals that are thin enough to fold after pressing and drying. Rose. Large, curved petals with a broad variety of colors and sizes. Roses are thin enough to fold when dried and pressed, but folders need to take into account how to cut and press with the curvature of the petals. The nice scent stimulates the senses when folding. Photo attributions at end of article. 2. Dry and Press Drying and pressing flowers for origami follows similar steps to drying and pressing flowers for preservation. The primary goal is to ensure that the petal ends up being soft enough to fold and not so dry that it becomes brittle. Because each type of petal differs slightly in fiber density, color, and overall composition, this process requires some experimentation to work out the optimum conditions. There are many guides to pressing flowers, and most focus on the preservation of colors and preventing mold from developing during the process, the latter of which is more important for folding flower petals. Keep in mind that when following these guides, your aim isn’t to dry the flower petals completely, as they may end up being too brittle to fold, but to find the ideal level of pliability and stress on the creases (which you will have to test for the model you want to fold). Preparing a flower petal so that it is suitable for origami requires two conditions to be satisfied: 1. The removal of excess moisture so that the petal can be creased easily and hold its position when creased. 2. The petal needs to be pressed into a flat sheet with reasonably consistent thickness so that the pressure applied to it is evenly spread out over its surface. The ideal outcome is for the flower petal to be pliable enough to fold and also retain its structural integrity so it can withstand the pressure applied when making various creases. Therefore, when considering the origami model you want to make, the type of flower used and its physical characteristics need to satisfy the conditions that allow it to be manipulated. For our purposes, many of these characteristics are already determined by the time the petals are collected. Factors such as the amount of moisture, color, pattern and other properties of the petals change as it starts wilting. Familiarity with the plant helps you to decide the most suitable time to collect the petals, keeping in mind that the drying and pressing process may alter the color and texture. You can change the texture of the petals by allowing them to dry partially before pressing them. Pressing the petals right at the beginning, while there is more moisture, will lead to a smoother texture on the surface. Keep in mind that the rate at which the petal dries will change based on various environmental factors like temperature and humidity as well as the size of the petals themselves. The precise timing can be difficult to estimate without operating in a controlled environment, and this can greatly affect success. The quicker a petal dries, the more brittle it is likely to be. In general, follow these steps to dry your flower petals: Use tissue paper or cloth to remove all moisture from the surface of your freshly picked flower petals. Once any surface moisture is removed, allow the petals to air dry. When the petals are noticeably drier (but still pliable) sandwich them between two sheets of any absorbent paper like blotting paper or newspaper. Press-dry your petals by placing weight atop them. This approach also forces the petal fibers to straighten, flattening the surface. Remove your petals once they have flattened and the excess moisture has been removed. The petal should still be pliable and slightly moist. The drying process can take a number of days or weeks. During this time, remember to check the paper surrounding your petals and exchange saturated pages for dry replacements. Doing so will help to minimize the discoloration of the petals during the pressing process. If left for too long, the petal will become brittle, prone to cracking, and too inflexible for folding. For petals with a lot of natural curvature, it might also be necessary to cut the petal at certain points to maximize the flat surface available. You can work out potential points to cut by pressing one of the petals and see where the petal folds on itself. I recommend press drying, even if the flower petals are already quite flat. As the petals air dry, they will sometimes lose their original shape or form, making them unsuitable for folding without flattening them first. Alternatively, a slow and gradual dehydration process can be obtained using devices such as dehumidifiers or materials like desiccants, but this requires a more specialized setup. A petal after being cut. Photo: Michael Lai. 3. Cut Petals Into Squares Once you’ve drained the excess moisture from your flower petals, you’ll need to use a very sharp knife or scalpel to cut them into the shape and size of the paper you need for the origami model. Where possible, try to maximize the size of the square that you cut from the petal to make it easier to fold. Select areas with fewer veins, as thick veins are more difficult to fold. If veins are unavoidable, try to orient the veins so that they don’t affect the major creases you want to make, allowing the creases to follow vein lines naturally. When cutting, you may also want to consider the pattern you intend to incorporate into the model and how it maps to the square shape you cut from the petal. By cutting two or more squares from the same petal, you can create hanakami “twins” that are cut from identical materials. Depending on the flower, your twins may have very similar or completely different colors and patterns! Two cranes made from squares cut from a single leaf resting on a similar leaf. Photo: Deb Yarrow. 4. Test Your New “Paper” Working with flower petals will be a challenge, even when the material is optimally dried. With care and experience, you’ll learn to minimize the stress and pressure that you apply to the petal, which will decrease the risk of tears or fraying. Before folding, if you suspect that the flower petal is too dry or brittle to work with, it is possible to moisten the material with a tiny bit of water. If you’re familiar with Akira Yoshizawa’s wet-folding techniques, the application is similar. This approach will prevent the flower petal from tearing due to the stress created by creasing. However, be careful! Applying too much water will ruin the material. You can test the consistency of the material by making a precrease to see if it is too dry to fold, or by pressing your finger onto the surface to see if the petal is too wet to retain the crease when you fold it. If the material is pliable and holds a crease well, it’s time to fold your model! 5. Fold Your Model Before attempting an actual fold, try a few test folds with the flower petal scraps to better understand how your petal reacts to stress and pressure. Depending on the model you’ve selected and how many petals you have been able to prepare, you may want to practice with plain origami paper cut into squares slightly smaller than the petal squares that you have cut. This will help train your fingers to work with smaller-sized papers and the various folds and creases required to make the model. When you feel confident enough with the plain paper, fold your flower petal into an origami model. No tools are required (although they can help), but a lot of patience is needed. Remember, even if you don’t end up with a completed origami model, the main benefit gained is from the process involved. When working with flower petals and other difficult materials, the journey is more important than the destination. Even with your best effort, you may not be successful — even if you are relatively experienced with hanakami. The cranes are quite small. Photo: Deb Yarrow. Preserving Your Model Once you manage to complete a model (congratulations!), you might wonder how long before the natural decomposition process takes its toll on your creation. A well-dried and -pressed petal can retain its colors for quite some time (months or years, depending on the flower), if kept away from direct light and in an enclosed container to limit exposure to air and moisture. If you so choose, the models can be preserved in resin to make them more suitable for display and handling. However, sometimes it is better to simply let nature take its course. An arrangement embedded in resin. Photo: Michael Lai. The photo above illustrates the difference that the preparation of the petal makes in preserving the colors of the flower petal in the origami crane (pressed and dried) compared to the flower (untreated). Even though both are preserved in resin to remove the element of air, the moisture in the flower and exposure to light continues to break down the material in the petal. This results not only in the loss or change of color as the pigments break down, but also in the structural integrity of the petal as the organic materials biodegrade. Photo: Deb Yarrow. Final Thoughts There is an indescribable feeling that comes from working with natural and unprocessed materials, whether it is the feel of the flower petals on the fingertips, the focus required when working with delicate materials or the impermanence of the finished model. I hope that the concept of hanakami will give you a different perspective about what origami is (and what it can be). It is surprising what happens when you choose to do something simple and do it well. I believe that this is the key to all things in life that are worth doing, and the secret to discovering new and interesting things around us. Maybe folding with flowers will even help you to think a little bit more deeply about art and its link to mental health and well-being. Give hanakami a try, and see where your experience takes you! Attributions for Photos in Table Bougainvillea: Clint Budd, CC BY 2.0, via Wikimedia Commons Delonix regia: B.navez, CC BY-SA 3.0, via Wikimedia Commons Orchid: Maciej Soltynski, CC BY-SA 3.0, via Wikimedia Commons Arne and Bent Larsen or A./B. Larsen, CC BY-SA 2.5 DK, via Wikimedia Commons Rose: Stan Shebs, CC BY-SA 3.0, via Wikimedia Commons
You must log in or register to comment.